Friday, April 26, 2013

Where Have I Been?

So, where have I been the last 2+ months? Well, we have some exciting news, we are expecting baby #2 in November...well it will probably be more like October because we have LARGE babies!
Anyways, I have been very sick, like 24/7 sick and nap time for Aston which was blog time for me became nap time for me. We didn't do much over the last 2 months, I didn't cook much, which means no new recipes and definitely didn't have time to craft.

But I am finally starting to feel better! I have some icky days still but most days are looking good for me, so that is good! I should be back to somewhat regularly posting. Life is changing around here in a lot of ways, so I'll be posting when I can. During this 2 month break, Aston has gotten older and is ready for more activity, so I'll be working on doing some school type things with him. We will be preping for baby and life will change then to, so we will see what happens :) Have a great weekend and see you next week sometime!

post signature

Caramelized Banana Cream of Wheat


I have been bored with breakfast lately so I needed a bit of a change this morning. I was racking my brain as to what to do and came up with this. It was super yummy and not very sweet at all. You could make it sweeter by adding more sugar but it's all a preference thing.

Ingredients:

Oatmeal or Cream of Wheat
1 Banana
1/4-1/2 cup brown sugar
1-2 tablespoons of butter
Non-stick pan
  1. Make your favorite Cream of Wheat or Oatmeal according to the box.
  2. Peel the whole banana, cut it in half so you have two long halves and then cut those halves down the middle (see my picture if you are confused.)
  3. Place brown sugar on a plate and press the moist, cut side into the sugar. You will probably have about 1/4 inch of sugar. That is perfect! Repeat for all pieces.
  4. In a non-stick pan, melt butter over medium-high heat. Place sugared banana's sugar side down into the pan and cook for about 2-3 minutes. The sugar with melt into the butter and could burn so keep an eye on it. Flip the banana's over and cook for 2-3 minutes on the other side.
  5. Pour your cereal into a bowl and then place the banana's on top. Pour the butter sugar mixture that is in the pan on top of both.
  6. Enjoy!
post signature

Wednesday, April 24, 2013

My very First BirchBox!!!

Yesterday, as I was literally running out the door to go have dinner with friends, a little pink box came walking in the door with Aston who had just gone with grandma to get the mail. I was sooooo very bummed that I couldn't stop a play with it right then and there BUT it was a wonderfully fun thing to wake up to this morning.
The pink box was my very first BirchBox. I have been hearing about this for about a year now from one of my favorite hair and make-up bloggers, Kate at The Small Things Blog. It is a little box full of beauty products. Some times they through in some snacks or like this month, some tea into your box as well. Some of the products are full sized and some are trials which is really neat.
Something else that is fun is that it looks like everyone's box is a little bit different. When you sign up for Birchbox, you fill out a Profile that details your beauty information (hair type and color, skin type and color, your make-up style, etc.) This month, Birchbox partnered with Women's Health Magazine with a theme of tiny tweaks, Big Results!

SO based on what I listed and how the cards were played, this is what I got in my box. (By the way, I have tried all but one of the products from my box today!)
Nexxus Hydra-Light Leave-In Conditioning Foam. Now I'm not a huge fan of leave in conditioner because it leaves my hair heavy and greasy feeling but today is day two of curly hair, which means that it is frizzy, add in the cloudy cool moist weather today and I looked a bit like a puff ball, so I figured why not try it. I pumped 1/2 a pump into my hand, rubbed my hands together and then worked the conditioner into the tops of my hair and most of the frizz was gone! I am impressed! I'll try it tomorrow after I was my hair and see how it does then but for frizzy days, I'm sold!

Sumita Eye Shadow Pencil-Tej (Light purple color) I love to play with color on my eyes and have looked at these Shadow Pencils at the store before but have never purchased one. Today I tried it on my eyes and it worked pretty good. The pencil is fairly light and very shimmery but I like how it looks and I just added some smokiness to it with my MAC "Knightly" eyeshadow.

Supergoop! Advanced SPF 37 Anti-Aging Eye cream. Now I'm not a girl who puts a lot of product on my face every day...I probably should be doing more, but right now I'm a moisturizer and light make-up person. But I am all about sun protection and since I just passed another birthday, I guess I'm not getting younger :). So I put this on this morning and after it was rubbed in, I didn't feel like there was anything there. A huge plus for me! And since my eyes get the most trauma as far as make-up and rubbing goes, I figured I should give it a try.

Yes To Cucumber Facial Towelettes. This was the first product I wanted to try. I stopped eating my breakfast and went to a mirror to use it. These are an all natural product and are hypoallergenic. I love the smell of cucumber and the packet said "soothing" and in the morning, a cool and soothing something on my face sounded heavenly. It felt great and didn't leave to much residue on my face which can be a problem with other towelettes. I'm saving my other two samples for our trip to Disneyland next month because I'm sure there will come in handy. If I like them still, I will probably be buying them to add to my nighttime routine.

And last but not least, I got a Yes To Grapefruit Daily Facial Scrub and Dark Spot correcting Serum Sample. I will probably try this tonight. My face has been a bit odd lately so I'm going to see how this works.

Well, I'm still super excited about this fun little box and seriously cannot wait to get my next one! I love surprises! If you want to get a $10 per month subscription yourself, go here to sign up!

I hope you enjoy your day and remember to take some time to pamper yourself, it's just makes you feel better.
post signature

Thursday, April 18, 2013

Fancy KitchenAid Mixer and Silhouette Promo!

Hello long lost blog friends! I've missed you! Next week I'll be sharing a little bit more about why I've been MIA the last 2 months BUT until then, I have a GREAT promotion and project to share with you!

Since Christmas when I received my Silhouette Cameo, I have been dying to decorate my KitchenAid mixer. I have seen some beautifully painted ones that I lust over, but are SOOO out of my price range, so when I saw that using Vinyl as an option to decorate my mixer, I was very excited!

By the way, I LOVE working with vinyl on my Silhouette. It is so easy and is probably my favorite media to use with it so far! I was nervous at first, but it is so very easy to use and work with. If my family isn't careful, I may be putting Vinyl on anything I can!

So how do you decorate your KitchenAid mixer?

Supplies:

Silhouette cutting machine (I love my Cameo!)
Silhouette's Premium Vinyl in any color you choose
Transfer Paper
Silhouette Hook
Silhouette Scraper
KitchenAid Mixer
Scissors
Your Design Choice

1. Clean your mixer and make sure it has dried completely.
2. Choose a design you would like to use. We chose to use a decorative leaf design. Then measure your area to determine how big you want your shape.

3. Cut the shape out you choose on paper to make sure it will fit in the area you want.

 4. Then, adjust your Silhouette to the cutting mode for Vinyl. Adjust blade and move the white loading wheel over to the 9" area.
5. Load your Vinyl into the machine using "Media Load" setting and press "cut."
6. When area is cut, trim the area away from the rest of the Vinyl roll. You will then peel the outer vinyl off of the image.
 It will look like this once you peel the excess.
7. Using the Hook tool, remove all the remaining "other stuff" from within the shape.
 It will look like this when all inner parts are removed.
8. Then grab a piece of transfer paper the same size as your shape. Begin to remove the white backing and place the sticky side down on top of the cut shape.
 9. Using your scraper, gently, but with pressure, press the transfer paper down onto the shape, getting out any bubbles you might see.
10. Now carefully peel the transfer paper up grabbing the vinyl. Go slowly so that you can help aid the vinyl to lift.
11. Carefully lay the shape across the area you want to cover. As you lay it down, gently press down to get all the air bubbles out from under the shape.  When it is finished laying down, use the scraper to help press the shape down some more.
12. Carefully start to remove the transfer paper and again, use your fingers to press the shape down and aid in the vinyl staying on the mixer.
And whalah, you're mixer is beautified! This is what it looked like when we were finished.
We then decided to add the same shape to the bottom on the KitchenAid. It looks great but was a little more difficult. Here are some tricks we learned as we did that.

-When adding the vinyl to an area that is shaped differently, cut in between the shape using a knife or scissors.
 It didn't lay as easily as the top and there were bubbles BUT it still turned out great and we were able to get the bubbles out after we removed the transfer paper.

SO...Do you want to have a nice vinyl designed mixer too? Do you want a Silhouette cutting tool and Vinyl in a nice little package? OR do you want Premium Vinyl at a GREAT price? Well, Silhouette has just that for you! 
Recently, Silhouette dropped the price of Vinyl from $14.99 to $9.99 and now you can get an extra 25% off of that! Amazing huh? I love working with vinyl and my Silhouette! It's a dream working together.

Today through April 26th you can get a Silhouette Portrait Bundle for $139.99 or the Silhouette Cameo Bundle for $269.99. Already have a cutting tool? Get 25% off all Premium Vinyl.

Just use the code BEAR to take advantage of this great offer!

This deal runs from April 18-April 26th!

And don't forget the code word is BEAR!


post signature

Monday, April 15, 2013

Meal Plan Monday is back


Hello, long lost blog. I've missed you and am looking forward to getting back to things.

Well, this week is a bit different because we will be celebrating my birthday numerous times this week with numerous people :) My birthday was yesterday and I had a great day with my family!

So here's the plan for the week:

Monday: Old Town Spaghetti Factory
Tuesday: Pork Tacos using leftover pulled pork
Wednesday: Crock Pot Stew Beef Chili
Thursday: Teriyaki Chicken Kabobs
Friday: My in-laws
Saturday: Greek Pasta Salad

I hope you all have a great start to your week! See you later this week!

post signature

Wednesday, April 3, 2013

Easter 2013

This Easter was so much fun for us! Aston is at the perfect age to really get into all the holiday activities and is so excited about everything!

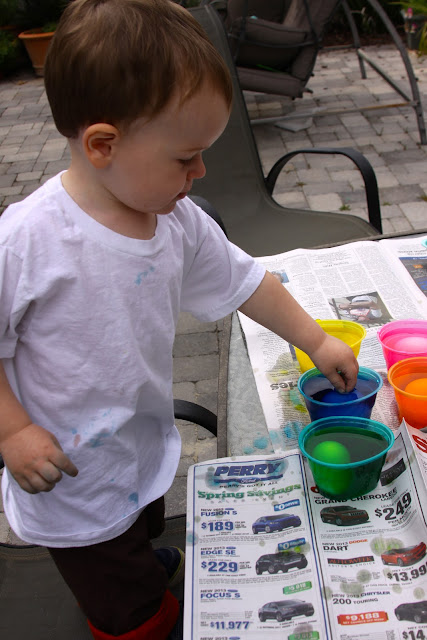
We started our festivities on Friday with dying eggs. Aston thought it was the best thing in the whole world! He kept exclaiming, "OOOOOOOO!" So much fun.
 Isn't it just the best thing ever! And check out that green hand!

Saturday morning, we did our Easter baskets since daddy wasn't going to be home on Sunday until later.
 Aston loved his pillow from Sarah and Abraham! It's just so stinkin' cute!
 Then on Easter, we went up to Maxwell's parents house for a late lunch when Max and his brother Sam got off work at the church. Here are some of our family pictures.
 My cute boys in their hats!
 After lunch we hunted Easter eggs. Aston discovered the candy right away!
 Grandma Betty gave him his Easter "basket."
 And chocolate. We have discovered that chocolate is his arch enemy. He did not sleep much that night :)
We had a great day celebrating that our Savior lives! We are so blessed to have Jesus in our lives!
post signature
Blogging tips