Tuesday, October 30, 2012

Shopping Again!


So this morning, I was going through the blogs I follow and came across this on The Macs blog. It is a 12 day Holiday Countdown from DaySpring. It counts down to Easter, Thanksgiving and Christmas and comes with a little book. Each day has something to remember, be thankful for or pray for on it. I can't wait to add it to our 12 Days of Christmas tradition. And if you go to Jess' blog, you can get this $7.50 plus shipping. Such a great price! I also bought a really cute journal that was on sale for $8.45. I can't wait to it to come in the mail!

Sunday, October 28, 2012

Shopping Adventures: Cool Things!

I have been an avid shopper for my almost 26 years thanks to my mom. She has been toting me around malls with her since I was born and I have grown up loving to shop. I love walking around a mall, walking through stores and looking at cool things that stores have to offer. I don't have to buy anything while there, I just love going. It's always a plus though when you find the perfect thing!

Today, my son was Hippo-napped by my in-laws and I got to go to the mall without him! My mom met me there and we got to walk around at our own pace without a stroller! Now Aston is a good shopper, and doesn't mind it too much but he only lasts so long.

Anyways, I was Hippoless and free to wonder! And I found some really cool things.

1. I found this really cool Minimergency Kit from Ms. and Mrs. When I got home, I looked them up and found that they have a ton of different "Kits" for all kinds of life events. This is such a cool gift! I would love to have a little bag and I mean little, fit's in the palm of your hand, in my purse for those oh crap moments. Such a great idea!
2. We also found this really cute make-up bag and travel bag from Apple and Bee. They are made with glittered fabric and I think they are just so cute! I think I'll be adding the Carry All Traveller to my Christmas list!

3. We then headed to H&M and found these cute bobby pins. They had gold ones and they also had metallic rose and grey ones as well. I have to buy both because they we $3 for each pack of 30. I can't wait to play with them!
I love finding cute, creative things while shopping. I love Shopping Adventures! Thank you to my in-laws for a surprise afternoon to enjoy myself and find some cute new things!

Monday, October 22, 2012

A Big Hippo 1st Birthday

My husband and I had so much fun planning Aston’s 1st birthday party. We choose to go with a Hippo theme because that has been his nickname since he was born. When we started the search for ideas, we had a hard time finding some that were specific to Hippo’s so we came up with our own version.

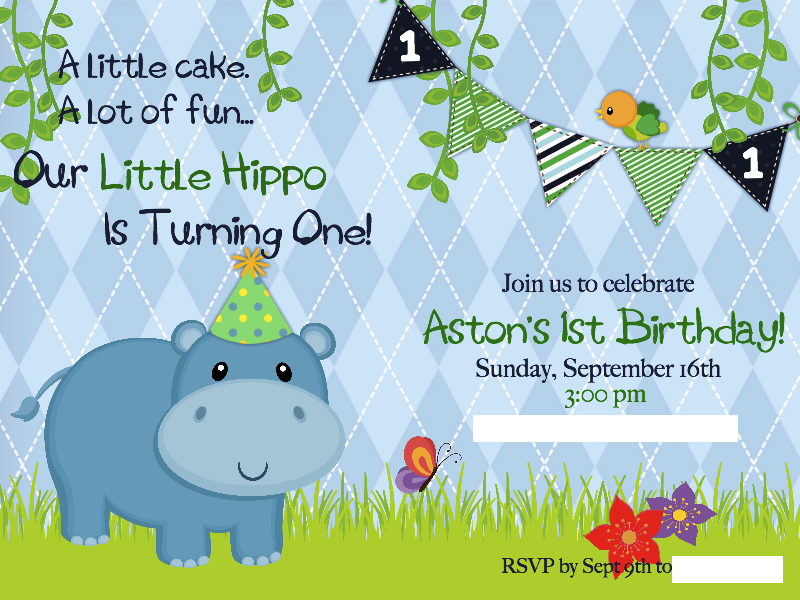
I came across the clipart graphics from Pixel Paper Prints and that spurred on the creation of all the signs, invitations, water bottle wrappers and other paper goods that I made.  This was the invitation for the party and I think it turned out so cute!

We came up with the idea of our guests walking through a balloon jungle to get to the party. To do this, we blew up 40-50 green balloons, tyed them to varying lengths of ribbon. We then tyed the ribbon to golf tees which we stuck into the ground. We think it turned out pretty good in spite of the wind that day.

We decided to call the food table “The Grazing Table.” 

The Menu:
Goldfishies- Goldfish Crackers
Baby Hippo Teeth: Mini Marshmallows
Animal Friends: Animal Cracker
Herbivor-derves: Veggie Trays
Baby Hippo Tails: Pretzel Sticks
We also had a 3 cakes that I made. The big cake has a topper from the Cupcake Stylist. We ordered a blue hippo with a yellow bird on his head and a palm tree. They turned out so great! We used an antique Wilton Hippo Pan for the gluten free cake. 

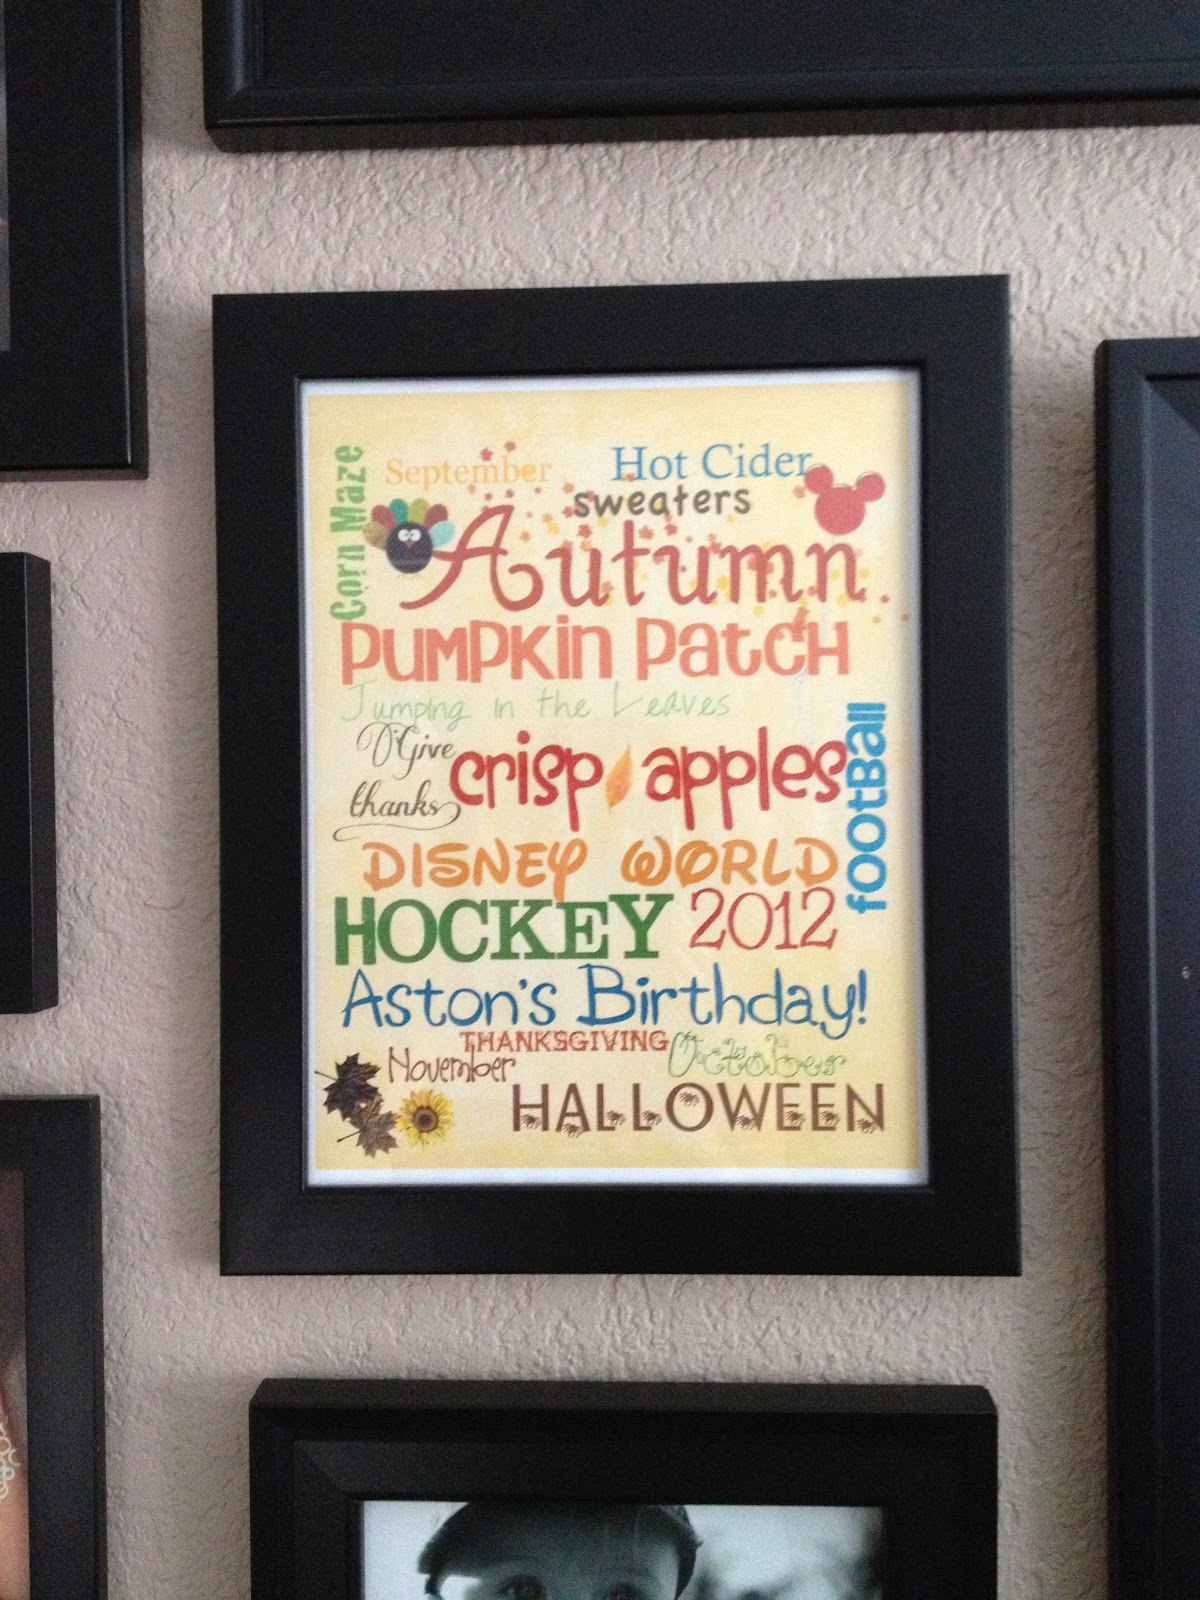
On the Grazing Table I made a sign of all of Aston's favorite things from the year. It was fun for our guests to see his favorite things.

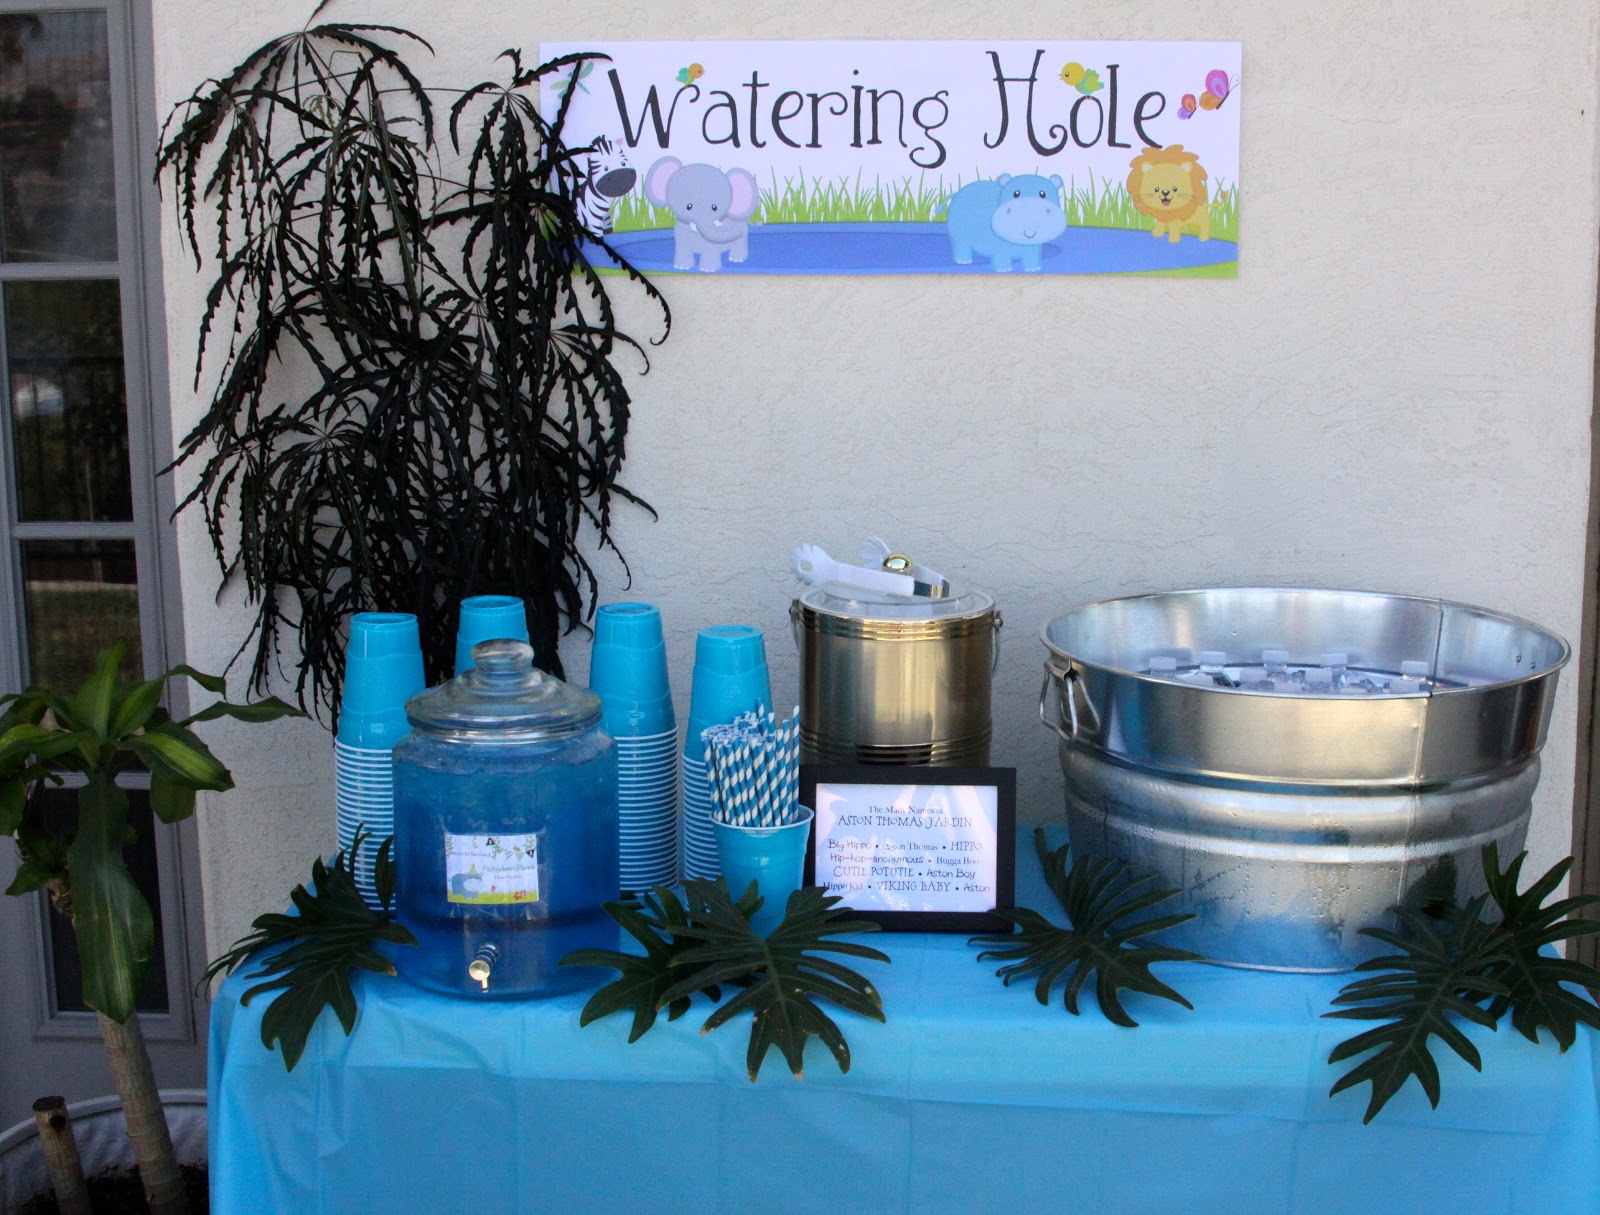
We called the Drink table the Watering Hole. At the Watering Hole, guests could find Pachyderm Punch: Blue Kool Aid and water bottles wrapped with the wrappers I made from the clip art.
It also had a sign of the Many Names of Aston. We are a nickname family :)
In order to look back at the year, I made this picture banner so that guests could see how much he had changed. Isn't he cute? I printed out the labels I made, attached them to a clothes pin and hung them on some Jute. It worked perfectly!
It was such a fun day of celebrating! I hope you enjoy!

Linked up with: Bird's Party

Sunday, October 21, 2012

I love my New Picture Wall!

I'm addicted to Pinterest. So many people as me if I ever do anything I pin and the answer is YES! All the time! I love how the whole thing works; pinning things that you want to come back and do...So much fun!

Any who, I found this picture a few months back and loved it but wasn't sure how to do it and because we are on a tight budget, I wasn't sure when we could do it either.


 This is how ours turned out!

Then I found this post from Roost.. An amazing trick to hang pictures. This is how we did ours.

First, we did not buy frames that matched in a certain width or hight. We used what we had and what we found on sale over time. 

Then, we put the puzzle together on the floor making sure the tops and bottoms we all equal across.
 
Flip them over where they are and lay wax paper over the back side of the frames tapping the sheets together. Trace the edges of the frames and mark the place that you would put the nail. (Sorry the picture didn't turn out on that but this is what it should look like once it's hung.)

Hang the wax paper on the wall with tape or tac, making sure it is level and that the top edge of the frames are straight.


Then place nails on the spot that you marked as being the place on the wax paper.

Pull down the wax paper and begin to hang the frames on all the nails. It wasn't 100% perfect but we only had to move 3 nails once everything was hung.

The whole project took about an hour to do after pictures were in the frames. It was a wonderful, easy way to hang the pictures and we will use the method again because it worked so great!

 The finished product! Well almost finished...

Friday, October 19, 2012

Oatmeal Caramel Apple Cookies


Oatmeal Caramel Apple Cookies
1 Cup Butter- softened
1 Cup Sugar
1 Cup Brown Sugar
2 Eggs
1 tsp Vanilla
2 Cups Flour
2.5 Cups Oatmeal
1/2 tsp Salt
1 tsp Baking Powder
1 tsp Baking Soda
1 cup Chopped Apple- cubed
1/2 cup Caramel Bits or Caramels cut into pieces
Cinnamon (optional)
  1. Preheat oven to 375 degrees
  2. Cream butter, sugar, eggs and vanilla together. Combine flour, oatmeal, salt, baking powder and soda in a separate bowl.
  3. Combine dry ingredients with butter-sugar mixture.
  4. Mix in apples and caramel bits.
  5. Spray your cookie sheets with cooking spray. The caramel sticks.
  6. Scope onto cookie sheets and bake for 10-17 minutes, until golden brown.
Enjoy!


Thursday, October 18, 2012

Stuffed Zucchini

This year, Max got very into gardening and we ended up with some really great veggies! He planet two Zucchini plants, both from seed and they did great! Both were never bitter no matter how big they got.

As is typical, we had a few zucchini that got HUGE. That's when we came up with this recipe. We love Stuffed Peppers, so I figured why not try stuffed Zucchini. It turned out great!

Stuffed Zucchini
2-3 Large Zucchini or 6-7 regular sized
1lb Ground beef
2 t Garlic Salt
3 dashes Worcestershire Sauce
1-2 dashes red pepper flakes
1/2 cup White or Brown Rice
1/2 cup Water
2 can's Diced Tomatoes
1 Cup Cheddar cheese
Panko bread crumbs (optional)
  1. Preheat Oven to 350 Degrees. Cut Zucchini long ways and scrap the seeds out and season with salt and pepper. Place zucchini in a baking dish and place in oven to precook for about 10 minutes.
  2. Brown ground beef and season with Garlic Salt and Worcestershire Sauce. Drain.
  3. Add rice, water, red pepper flakes and tomatoes and bring to a boil. Cover, reduce heat to low and cook for 15 minutes until rice is mostly cooked. Mix cheese into the mixture.
  4. Scope mixture into the zucchini and sprinkle with bread crumbs. Bake for 15 minutes until golden brown.
Enjoy!

Wednesday, October 17, 2012

Fall Decorating

I finished fall decorating on Sunday. I love having the house decorated and feeling festive! 

The felt leaf garland I made. I found the tutorial from A Beautiful Mess. It was really simple and inexpensive and it turned out great!
The mantel downstairs. We used fake leaves and fruit and 3 little pumpkins.
I made this poster of everything we are celebrating and doing this fall.
I got the grapevine pumpkin in the dollar section at Target and the glitter pear and pumpkin from Michaels. I made the fall pennant banner. You can download it here.
We bought this feather wreath when I was in high school. I have always thought it was really fun! I also made the Halloween pennant banner. You can download it here.
The entry way.
I love these pumpkins.
We got our Blue Eyed Boy this cute little Hayride and Thanksgiving Little People set. I think it's so stinkin' cute! He loves playing with it. It never looks like this :)
Happy decorating everyone!
Blogging tips